Resin-coated Versus Fibre-based Enlarging Papers

First, it should be pointed out that these days, both Resin-coated (RC) and Fibre-based (FB), multi-grade (MG) enlarging papers are capable of producing outstanding results in the Darkroom, but, RC and FB are generally used for slightly different reasons. We are primarily talking about black and white prints of course; colour prints (produced in the Darkroom) use RC-type papers (e.g. from Fujifilm or Kodak).
A Summary of RC versus FB Papers
Modern FB and RC papers are capable of outstanding results in the darkroom, given a good negative to work with and skilled print-craft. Even an experienced darkroom printer would be hard-pushed to tell apart RC and FB prints from the same product range when mounted and displayed e.g. in an exhibition. Both are capable of out-performing the best computer-generated ink-jet prints both in print quality and archival quality. These papers are also widely available in a range of print sizes ranging from 5x7 inch to the huge 20x24 inch. So why use FB at all? What are the differences of FB and RC papers? Below is a summary.
Comparison of RC and FB Papers
Resin-coated (RC) Fibre-based (FB)
Low(ish) cost High costQuick to wash and dry Slow to wash and dryHigh quality prints Finest quality printsMay not tone well Nearly always tone wellUnknown archival quality Archival quality prints possibleMay be slightly “slow” Often “faster” than RC paperRobust when wet Fragile when wetDries flat May dry with a marked curl or buckling in the paperStable size Print swells when wet (around 2% size increase)Little dry-down effect Dry-down effect may be more pronouncedLittle chemistry absorption Will absorb relatively more chemistry than RCCannot withstand heat Will withstand moderate heat for a short time
Construction of RC and FB Papers
Both RC and FB papers use a photo-sensitive emulsion layer (usually variable contrast these days) but otherwise the construction of these papers is quite different.
RC Paper Construction
Below is shown the construction of RC paper.
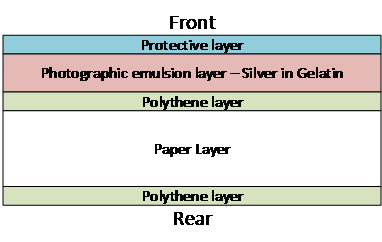
The construction of Resin-coated paper
The light-sensitive Silver-gelatin emulsion layer is protected by a protective layer of Gelatin, often called a super-coat. This layer is also used to impart a surface finish to the paper which may be gloss (no texture and highly reflective), semi-matt (often called pearl) or matt (satin; no reflection).
The emulsion coating is below the super-coat but is isolated from the paper layer by a polythene coating. The paper layer is laminated with two layers of polythene coating; at its front and rear as shown above. It is essentially just paper but will vary in thickness depending upon the paper quality. Standard RC papers are around 190-200gsm. However, heavier RC papers in the 250-310gsm range are available which are of higher quality so cost more.
Polythene is transparent and chemically impervious. It does a very good job of isolating the paper’s fibres from the emulsion that soaks up the chemistry (developer, stop-bath and fixer). This gives RC papers two key advantages over FB papers; durability and low absorption. The combined laminate of polythene and paper is strong making RC papers as robust when wet as when dry.
FB Paper Construction

The construction of Fibre-based paper
Above is shown the construction of FB paper. Like its RC counterpart, it has a protective layer and below that a Silver-gelatin emulsion layer. The protective, super-coat coating may be smooth (gloss finish), or textured e.g. to provide semi-matt or matt finishes.
Unlike RC papers, FB papers incorporate a Baryta coating between the emulsion and the paper layers. Baryta is used as a brightening layer and is made from Barium and Strontium Sulphate compounds. The inert Baryta coating stops impurities of the paper leaching into the emulsion layer and also provides brightening of the image because of its higher reflective properties compared to paper. It may be tinted to provide warm- or cool-tone papers. However, being just a thin coating like the emulsion and super-coat layers it normally allows the texture of the paper to be seen at the front of the paper. This means that “gloss” is not so glossy as gloss RC papers unless specially dried to achieve a fine-gloss finish (Ferrotypes.)
The FB paper’s paper layer is usually thicker and heavier compared to RC paper; at least 250gsm. This gives the dry FB print the consistency of card rather than paper. You can usually tell you are holding a FB print by feel and weight alone. The exposed paper base of FB paper is a disadvantage leading to much longer washing and drying times and a lack of durability and swelling when wet. It can also absorb chemicals into the paper through the top three coatings.
Ease of Use
So far, we have considered a simple comparison of RC and FB papers and looked at their construction. Now we will delve more deeply into their differences in terms of factors that affect ease of use, aesthetics and cost.
Durability
An advantage of RC paper is that it is durable; nearly as durable when wet as when dry. The polythene-paper laminate is the key. Only the top coatings (super-coat, emulsion and polythene) and the back coating (also polythene) come into contact with wet; the paper layer remains dry. Because of this property, RC paper is durable and physically stable.
By contrast, FB paper is not very robust when wet. From the moment the paper enters the developer until the final wash, the paper layer gets wet. When paper fibres get wet as we all know, paper becomes rather fragile, tearing easily. FB paper offers little protection from damage when wet. The only advantage this may offer is that a bad wet print can be easily destroyed! Paper (and gelatin too) swell when wet. It is the reason most Watercolour painters stretch their watercolour canvases first. The same happens with FB paper which leads to an effect called “dry-down” and why FB papers are more sensitive to drying compared to RC papers (see later).
Printing

The printing chemistry is the same for RC and FB prints
The process is essentially the same for RC and FB prints: develop, stop, fix, wash and dry. However, due to the absorption properties of FB prints, it takes longer to carry out each step.
RC papers are relatively easy to deal with. In addition to being robust, they only absorb a tiny amount of chemistry compared to FB paper. In development, the RC paper usually only requires about 1 minute to develop to completion (i.e. there is no un-converted Silver-halide left to convert to Silver.) Although a stop bath is recommended for RC papers to immediately stop development (10 seconds in the stop bath), so little developer is absorbed by the emulsion that water alone will arrest development. Stop bath stops some of the developer being transferred to the fixer – water alone may result in very weak developer being produced, still capable of reducing the working life of the fixer. Fixing is similarly quick with RC paper; around 30 seconds is recommended because so little is absorbed.
By contrast, FB papers take at least twice as long to develop, stop and fix compared to RC prints and are much less durable than RC papers when wet. 2-3.5 minutes in normal-strength developer is recommended because some developer soaks into the paper not just the emulsion. The FB print may not develop to completion and will carry on developing (i.e. shadows getting darker) until it hits the stop bath. For this reason, placing the FB print in the stop-bath print-side down is recommended so that development stops immediately. Fixing of FB prints takes longer; about 60 seconds compared to 30 seconds for RC prints. However, the fixing time must not be extended because all the while the paper base is absorbing chemistry; we want as little fixer as possible to be absorbed by the paper.
Washing and Drying
Washing and drying of RC papers is quick. We still need to remove every last trace of chemistry from the super-coat and emulsion, but any residual chemistry (e.g. fixer’s insoluble compounds) that come into contact with the polythene will be repelled to wash out straight away. A 3-5 minute wash in running water is recommended. Even a 30 second rinse followed by partial drying is ok for test strips and work prints. If an RC print is left for too long in the fixer – or water it could lead to de-lamination of the polythene and paper, so it is recommended that RC paper is not left in water but instead should dry. Drying of RC paper is relatively quick compared to FB paper. 15-20 minutes in air should be sufficient.
FB prints require a lot more washing compared to RC prints due to their much greater absorption. After fixing, the FB print must be thoroughly washed to remove both soluble and insoluble compounds that would otherwise stay in the paper. Around 30-60 minutes is recommended depending upon the paper. The wash time depends upon the duration of the developing and fixing stages – and therefore how much chemistry was absorbed by the paper. In order to minimise the wash time the minimum recommended fixing time should be observed. Handling a print between fixing and washing often takes place to inspect the print but the print should always be rinsed down first to remove some of the fixer before handling.
A Wash-aid (Hypo clearing agent) may be used to reduce the wash time of FB paper. After an initial wash of about 5 minutes to remove the soluble impurities in the print, the print is placed in a bath of wash-aid for about 10 minutes. The wash-aid removes otherwise insoluble impurities. A final wash of 5 minutes will remove the wash-aid from the print before it can be squeegeed and left to dry. Such treatment cuts the unaided wash time from up to an hour to around 20 minutes.
FB prints when wet are not very durable. 10x8 inch paper is ok to handle with tongs. The much larger 20x16 inch FB papers for example need a lot more care and two sets of tongs to avoid damage when handling.
Toning
Toning with Selenium Sulphide protects the print from contamination and long-term exposure to air by changing the Silver into a more stable compound that does not tarnish. Toning can improve the quality of a print. Toning may also increase the contrast of a print, making the shadow density (therefore DMAX) higher. It can also change the colour of the print from a greenish grey to a cooler purple-grey depending on how much toning is applied and the nature of the paper itself. Toning may be used just to impart further protection to a print or artistically to increase contrast and change the tone.
In the past, the tone-ability of RC prints was questionable. However, FB prints usually tone well. Often the tone-ability of FB meant that only FB paper was used if toning was to be applied. However, the latest RC papers such as Ilford MGRC-V do take toning well. Toning becomes more pronounced the longer the print is left in the toner and the concentration and temperature of the toner also have a significant effect. Toning in Selenium starts with the Shadows and moves up the grey-scale towards the highlights. Warm-tone FB papers tend to tone particularly well and the toning may impart a warm colour (red/brown). Cool papers take on a cooler purple/blue colour. Toning in a two-bath (bleach and toner) sepia toner is sometimes used. Sepia toners impart a rather obvious biscuit or brown tone to the print that moves from the highlights towards the shadows. Pure Silver is replaced by a Silver compound that is brown. Split toning may use both types of toner to enhance the colour effects of the print. A split-toned or sepia print really cannot be called black and white or even monochrome anymore!

A Sepia-toned and framed print on Ilford MGRC-V RC paper
After toning, the toner must be removed from the print. It is recommended that a similar wash and dry cycle is followed without the need for Hypo clearing agent.
Flatness
RC prints always dry flat. The polythene resin laminate means that the paper layer never normally gets wet so does not buckle or curl. Conversely, FB prints tend to curl – inwards around the emulsion coating as they dry. Humidity tends to impart buckling and/or curling of the paper fibre base so FB prints do not naturally dry flat.

A 20x16 inch electric FB print dryer showing a 10x8 FB print
A number of techniques are used to dry FB prints so that they are reasonably flat when stored. Pegging FB prints together back-to-back is one technique. Using a drying screen in air is another. Still yet another technique is to blot them and let them dry between heavy books or some form of press. Electric dryers at 50-60 deg. C, taking advantage of FB’s tolerance of heat can cut the FB print drying time from hours to minutes. With electric flat-bed driers, the paper’s paper side is usually placed in contact with the stainless-steel heater with the emulsion in contact with the canvas. Usually some pressing with blots or mountboard is still required though.
Stability and the Dry-down Effect
We have touched upon stability a little in the previous sections. RC prints are stable in size and do not suffer much with dry-down effects because only the very thin top and bottom coatings come into contact with water and therefore swell. However, FB prints expand in size by over 2% when wet if unconstrained. They are exposed under the enlarger when dry, but they are inspected when wet and they are then left to dry where they return to their original size. FB prints are not very stable and may suffer from the dry-down effect.
What is dry-down? In short it is the effect on mid-tones and highlights. Perceived density increases and local contrast is reduced as the FB print dries.
Like film, unexposed enlarging papers are made up of microscopic particles of Silver-halide in their emulsion coating. When exposed from a negative, developed and fixed, some Silver-halide particles that are exposed to light are converted to Silver and appear on the paper as an image.

Silver crystals on a dry FB print under the microscope (x40 objective).
It is actually the gaps between the Silver particles of the negative that do the work of creating the latent image on the enlarging paper; the negative’s Silver grains themselves block light from the enlarger. Thus, the positive, developed print contains grains of Silver where the negative’s gaps between grains lay. Below is shown a mid-tone on a dry FB print under high magnification.
If you look closely you will see the Silver crystals and also the much larger paper fibres (slightly out of focus).
When a FB print gets wet, its dimensions change significantly due to paper and emulsion swelling. The gaps between Silver grains gets larger due to the paper layer and emulsion swelling, reducing density in the mid-tones and highlights and increasing local contrast. Conversely, the FB print’s gaps between Silver grains decreases with the effect of increasing tonal density and reducing local contrast. Full blacks and full whites are not affected by dry-down so it tends to be the mid-tones and highlights that are affected. This change in density from wet to dry is commonly referred to as the dry-down effect. When the print was inspected, it was usually wet or at least damp. The mid-tones and highlights may have looked bright. When the print is dry, the highlights may lose some of their “sparkle”. The dry-down effect should be pre-empted by an experienced printer. Drying off the print first e.g. with a squeegee before inspection may reduce the effects of dry-down. Better still, put a test print in a Microwave oven to completely dry it and assess the mid-tones and highlights. Using a low intensity inspection lamp may also aid with adaptation to dry-down.

The effect of dry-down on density
Dry-down is a complex effect that is dependent on both contrast and perceived density (reflectance) and so is beyond the scope of this article. However, for those that are interested, below is shown a simple plot that may explain the dry-down effect in FB prints.
There is only one exposure stage when the print is dry. The dry-down effect depends upon the perceived contrast and density when the print is wet. The dashed line is for a wet FB print and the solid line is for a dry FB print. We can see that the paper swelling when wet has an effect on the density, pushing it down so making the print appear brighter.
Archival Properties and Storage
RC papers were invented in the 1940s and became widely available in the 1960’s. Originally such papers did use resin in place of polythene, but the name has stuck. During the 1970’s and the next 2-3 decades, RC papers were of inferior quality being thin, prone to cracking and de-lamination of the resin or polythene coatings. RC papers were used for snaps and work prints with most professionals and keen amateurs preferring to print black and white using fixed-contrast FB paper and gallery work was always on FB paper. Afterall, FB technology had barely changed in over 100 years and has proved itself to be stable in archive quality.
Many collections of family snaps were printed on RC papers, including colour prints to this day. The old RC papers had less and less Silver in them in order to keep the cost of these papers down as wholesale Silver prices sky-rocketed. As a result, the image quality suffered. FB papers became the Gold-standard, even with the introduction of variable-contrast papers.
However, RC print technology has improved significantly, and of late, we think that they are close to FB print quality without any of the drawbacks of FB papers. RC paper is stable but its archive quality is still less well known compared to FB because it has not been around for so long let alone stored in an archive for very long periods. It is estimated by some to be around 80-100 years. There are chemicals in modern RC paper e.g. in the polythene laminate that may raise archival issues in the long term even if the technology has dramatically improved overall; we simply do not know as much about the archive quality of RC compared to FB papers.

The Washmaster Eco 20x16 inch print washer is ideal for economically washing FB prints to archival standards
The International Standards Organisation (ISO) has produced a number of standards that specify archival quality and creating an archive using scanning or digital photography. The standard that is concerned with archival quality paper is ISO 11108:1996.
All prints should be stored at room temperature (20 deg. C) or lower. When displayed, they should only be displayed in a glass frame to avoid direct contact with the air and the mount materials and frame itself (if touching the print) should be acid-free.
Aesthetics
So why print with FB paper? Why is it still available and widely used? No doubt there is an element of prestige and printing prowess associated with using FB paper. As we have seen, its use is much trickier to use compared to RC paper and a beginner in Darkroom print-craft should use RC papers to start with. Both RC and FB prints can achieve outstanding results even compared to ink-jet printers using high quality paper.
It may be said that even an experienced darkroom worker would be hard-pushed to tell the difference between RC and FB when prints using both are placed side-by-side under glass and illuminated with the same light. There used to be a clear distinction between RC and FB print quality, the latter obviously achieving richer blacks and deep shadows compared to RC. There is still some benefit to using FB. The light from the enlarger travels once through the paper and is reflected and scattered slightly by the Baryta coating, then returns a second time through the same emulsion layer so increasing the emulsion’s effective speed. Maybe this is why FB papers were traditionally a bit faster than their RC counterparts, but now the gap has narrowed with the latest RC emulsion being as fast as FB emulsions.
So, now the gap between FB and RC quality is small. What remains is the issue of archival printing which is better known for FB papers. For the foreseeable future, FB will remain the material of choice for galleries, exhibitions and museums. Print mounting technique and material is equally important to the print itself to maintain the quality. A badly mounted print using cheap materials may slowly damage the finest quality FB print.
Cost
There is no doubt that FB papers cost significantly more than their RC counterparts, 30-50% more in fact. Of late the quality gap between RC and FB paper has considerably narrowed though. Perhaps there is more Silver in the latest RC emulsions than before; certainly, these papers cost a lot more than they used to just 10 years ago.
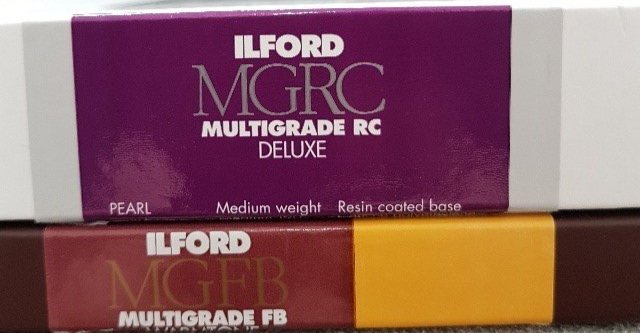
Ilford MGRC Deluxe Pearl and MGFB-Warm tone papers
There is perhaps a hope that the best RC papers are broadly equivalent in image quality to their FB counterparts and that a work print produced using RC will transfer easily to FB – just change the paper for the final print? Our experience has shown the opposite to be true. Maybe it is all the extra time and steps involved with working with FB, not just the speed and contrast differences but if a print is to be produced using FB, then stick with FB for test strips, work prints and the final print. Accept that the process of producing the print may cost over 30% more, size-for-size than working with RC papers
Conclusion
In this article we have looked in summary and in detail at the construction and use of RC and FB enlarging papers. We have seen that for the ultimate in print and archive quality, FB wins over RC. We have also looked at stability and the dry-down effect in some detail. However, the quality gap between RC and FB has considerably narrowed these days with the finest RC papers not only costing more than their older counterparts, but offering outstanding image quality that compares very favourably with FB.
FB is harder to work with compared to RC which in itself attracts a certain prestige for experienced printers. FB is the preferred medium for galleries and museums, its archival quality being assured providing top-quality materials for printing and mounting are used.
RC papers are so good for black and white printing that both the novice and experienced printer should not be shy of using them. FB may be reserved for those special prints that are produced for galleries or customers and the print is only as good as its mount.
Adrian Nash 02/02/22